
Summary of Contents for Flo Vigaro
- Page 1 Instruction manual FLO Vigaro Next Generation English Rev. 1.0 - July 2018 Vigaro from REV 4.15...
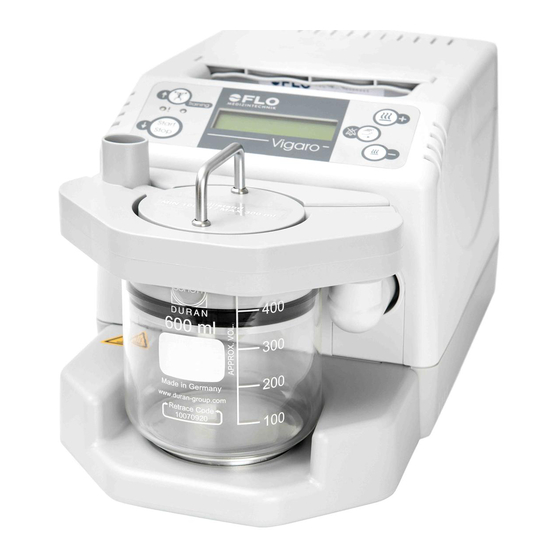
- Page 2 Ventilation slot Equipment handle Breathing hose connection Pressure gauge hose connection Beaker Filter box Control unit and display Air humidifier cover Connection angle Heating plate (Rear view of the device see back page)
- Page 3 Instruction manual FLO Vigaro Next Generation English July 2018...
-
Page 5: Table Of Contents
Contraindications Side effects Functional description Safety Responsibility of the user / owner Safety regulations Instructions for use of the FLO Vigaro Symbols on the device Symbols on the packaging Operation Display and keys Menu sequence when starting up the device... - Page 6 Content Cleaning / Disinfection / Processing 10.1 General 10.2 Summary of cleaning tasks 10.3 Filter change 10.4 Processing / Reuse 10.5 Disinfection Maintenance Storage Disposal Clearance certificate Travel / transport 15.1 Checklist 15.2 Emergency solutions 15.3 Producer's declaration / Customs Scope of supply Approved accessories Spare parts...
- Page 7 Introduction The FLO Vigaro are a modular positive airway pressure generator. The functional design means the machine is easy for patients to use. The design primarily focused on control engineering, noise insulation and air filtration. Problems such as nasal irritation and drying out of the nasal mucous membranes are prevented by the air humidifier which comes as standard.
-
Page 8: Appropriate Usage
Contraindications The FLO Vigaro should not be used for some medical conditions, or only with particular caution. In these cases, therapy with FLO Vigaro remains the particular decision of the treating doctor. This includes:... -
Page 9: Side Effects
Skin irritation / allergic reaction of the skin Functional description Control concept: The FLO Vigaro operates along the principle of an electric air turbine. The linearly adjustable positive pressure level of the therapy pressure needed at any one time is generated with great accuracy. -
Page 10: Safety
Appropriate usage Air humidification concept: In the integrated air humidifier the ambient air which is drawn in is passed across the surface of the water, warming and humidifying it, effectively preventing the mucous membranes drying out as a result. The individual humidity level can be adjusted by the patient by setting the heating plate temperature accordingly. -
Page 11: Safety Regulations
Do not cover the device. The air intake must not be blocked. This may cause therapy to fail and damage the device. Caution! Maintain a safe distance between the FLO Vigaro and other devices that emit high frequency rays (e.g. mobile phones). -
Page 12: Instructions For Use Of The Flo Vigaro
Safety Transport: Never transport the FLO Vigaro when the beaker is full. The remaining water may damage the device. Accessories / spare parts: Only use suitable accessories approved by FLO Medizintechnik GmbH. Accessories must be complete and undamaged. The use of unauthorised accessories can cause malfunctions or even damage to the device. - Page 13 Ensure that an outlet system is always integrated. Ensure that the hoses are correctly secured. Only use a FLO Vigaro that is working properly. Report any faults to your dealer. If you do not need the device for several hours, turn it off at the main switch.
-
Page 14: Symbols On The Device
Symbols on the device Symbols on the device Protection class II, totally insulated Protection rating IP 30 - protected against access by a tool - protection against solid foreign bodies starting at 2.5 mm - no protection against water Do not dispose of as household waste Type B electric shock protection Caution! Observe the warnings in the operating instructions. -
Page 15: Symbols On The Packaging
Symbols on the packaging Symbols on the packaging Fragile, handle with care Protect from moisture / Keep dry Limit temperature (storage) Limit humidity (storage) Limit air pressure (storage) -
Page 16: Operation
1 minute. Additional displays: Das FLO Vigaro features 2 additional LEDs: The green LED is always on when the device is in standby. Once the motor starts, the green LED goes out. - Page 17 Operation Control panel keys: The FLO Vigaro has 5 keys in total, with the following functions: Status Action Start therapy Standby Start the ramp (Start / Stop key Start / Stop key 5 seconds) Therapy Stop therapy Other functions: Next menu item...
-
Page 18: Menu Sequence When Starting Up The Device
Operation Menu sequence when starting up the device The following menu sequence is displayed when the device is first started up, i. e. is plugged into the mains or connected to a 24 V DC (12 V DC) supply: Current software revisions and device identification Device serial number Current time on therapy hour... -
Page 19: Quick Start Instructions
FLO Vigaro, and the patient should be wearing the mask. -
Page 20: Therapy Displays
In this case we recommend the use of a heated hose system. Please contact your supplier to order this. Therapy displays The FLO Vigaro has 3 different therapy displays. Current target pressure Therapy display 1... -
Page 21: Training Mode
Operation current tidal volume < Tidal volume Vt - Tidal volume current tidal volume > tidal volume Vt + 20% - Breathing rate Displays current breathing rate Display of current measured - Inhalation time Inhalation time - Breathing I/E ratio Displays current I/E ratio Current leakage Therapy display 3... -
Page 22: Start-Up
A lower position allows any condensation in the hose to simply flow back into the air humidifier. Keep the FLO Vigaro out of direct sunlight and away from heat sources and humid atmospheres. The FLO Vigaro does not need cleaning before initial use. -
Page 23: Breathing Air Humidifier
Start-up Breathing air humidifier Fill with water: The humidifier is a standard part of the FLO Vigaro. It consists of 3 parts: the heating plate, the beaker and the humidifier lid. To fill the beaker, first detach all hoses from the device. - Page 24 Start-up Put the humidifier lid back on the beaker. Put the beaker with the lid on back in the device. When doing so, the air humidifier lid must snap into both retaining brackets and be positioned straight on the connecting joint. Power: At room temperature, if the air humidifier is set to level 9 and a pressure of 10 hPa...
-
Page 25: Breathing Hose
Start-up Breathing hose The FLO Vigaro will only function with breathing hoses which have an internal pressure gauge hose. This pressure gauge hose must be connected to the pressure gauge hose connection on the equipment. The other end of the pressure gauge hose should extend almost as far as the mask. -
Page 26: Mask
Start-up Mask Please consult the latest instruction manual before using the mask and / or outlet system. Oxygen intake Oxygen should be introduced via an additional item of equipment close to the mask. The following points must be borne in mind regarding oxygen therapy: In oxygen therapy the oxygen concentration inhaled is dependent on: Breathing pattern... -
Page 27: Memory Card
This memory card should only be removed when requested. The memory card is not suitable for other devices and may no longer function in the FLO Vigaro after being used in other devices. If you are asked to remove the memory card, you can remove it... -
Page 28: Alarms
Alarms Alarms The device is equipped with various alarms to warn the user / patient about errors in operation or device faults. Alarm settings cannot be changed. All alarm messages include numbers at the bottom, which are used as a code for the alarm. -
Page 29: Medium Priority Alarms
Alarms Medium priority alarms 8.1.1 Pressure too high Alarm Actual pressure value too high (C30) Display Alarm Actual value exceeds set target value by 20% Delay Cause of alarm present for at least 2 seconds Medium priority Acoustic alarm Visible alarm signal Yellow LED flashes Possible cause Hose system blocked... -
Page 30: 8.1.2 Pressure Too Low
Alarms 8.1.2 Pressure too low Alarm Actual pressure value too low (C31) Display Alarm Actual value is below set target value by 20% Delay Cause of alarm present for at least 10 seconds Medium priority whilst cause of alarm present Acoustic alarm Visible alarm signal Yellow LED flashes... -
Page 31: 8.1.3 Disconnection
Alarms 8.1.3 Disconnection Alarm Disconnection error (C13) Display Alarm No pressure build-up Delay Cause of alarm present for at least 10 seconds Medium priority whilst cause of alarm present Acoustic alarm Visible alarm signal Yellow LED flashes - Hose system not connected properly Possible cause - Major leakage occurring The acoustic alarm can be confirmed indefinitely... -
Page 32: Low Priority Alarms
Alarms Low priority alarms The corresponding fault is displayed for all alarms. The yellow LED stays lit for all faults. Device-specific alarms are triggered whenever there is a problem with the device. With the majority of possible faults, the device can no longer be used and must be checked immediately by a service engineer. - Page 33 Internal device restrictions clock faulty (no data recorded) Maintenance is required Factory maintenance is required Motor control fault Memory card not supplied by FLO Medizintechnik GmbH Yes, after Memory card resetting the needs to be memory card reset using FLOsoft...
-
Page 34: Help With Therapy Problems
Alarms Display Error Continued usage The alarm limit for under- shooting the tidal volume has not been met The alarm limit for exceeding the tidal volume has been exceeded No (if necessary External voltage recharge the ext. is too low battery) Help with therapy problems Problem... - Page 35 Help with therapy problems Problem Cause Solution Pressure gauge hose Connect pressure gauge hose not connected to the and therapy device therapy device The Therapy device Water in pressure Dry pressure gauge hose does not start gauge hose pressure is much too Pressure gauge hose Check pressure gauge hose high and the therapy...
-
Page 36: Cleaning / Disinfection / Processing
Cleaning / Disinfection / Processing Cleaning / Disinfection / Processing The following FLO Vigaro components form part of the breathing gas route and can be removed by the user / patient: Particulate filter: Glass Air humidifier lid Humidifier / equipment connecting joint These components require regular cleaning and maintenance. -
Page 37: Summary Of Cleaning Tasks
Clean the beaker with mild soap in the dishwasher. Air humidifier lid: Clean the humidifier lid using mild soap. Connecting joint: No special cleaning required Neither the FLO Vigaro nor any of the attached parts provided for by the manufacturer can be sterilized. - Page 38 Cleaning / Disinfection / Processing Overview table – regular checks / replacement Before Daily Weekly Monthly Yearly Change of patient External Check Test Battery Hose Replacement after 3000 Replace- system Check Cleaning therapy hours ment Mask Clean and replace according to instruction manual Mains cable Check Device...
-
Page 39: Filter Change
Cleaning / Disinfection / Processing 10.3 Filter change To change the filter, take a coin or similar thin object. Insert the coin into the Lock for the filter box. Turn the Lock for the filter box to a vertical position. Then pull the lock from the opening. -
Page 40: Processing / Reuse
These recommendations do not apply if there is a change of patient! The housing of the FLO Vigaro and its mains cable are cleaned by simply wiping with disinfectant. You can use a hydrogen peroxide solution (3% / 5%) for this. -
Page 41: Maintenance
6 years / 18,000 hours. The system's internal battery is designed to last for approximately 20 years. Storage Storing the FLO Vigaro: Store in a cool, dry place. Do not expose to direct sunlight or UV light. Max. storage time 10 years. -
Page 42: Disposal
Disposal Disposal FLO Vigaro: The FLO Vigaro should not be disposed of with household rubbish. Before disposal, please check the procedure with your service provider, supplier or health insurance company. The device must be disposed of correctly via an authorised electrical waste recycler. -
Page 43: Travel / Transport
Travel / transport Travel / transport 15.1 Checklist You can use the following set of points as a checklist for planning a journey. If you have booked a scheduled flight, inform the airline before you set off that you are taking your breathing therapy device with you. -
Page 44: Emergency Solutions
Travel / transport 15.2 Emergency solutions The following table lists emergency solutions for solving problems in the short term. Problem Emergency solution Emergency material Leaking hose Wrap adhesive tape Insulating tape several times around the breathing hose at the point where the fault is Broken forehead pads Glue Superglue... -
Page 45: Producer's Declaration / Customs
Travel / transport 15.3 Producer's declaration / Customs Prevent potential problems at customs. Get confirmation from your doctor that you require the therapy. All you need is a signature from the attending clinic / doctor in the patient's health record. Product declaration - German Hiermit bestätigen wir, dass dieses Produkt ein Druckatmungsgenerator ist. -
Page 46: Scope Of Supply
Scope of supply Scope of supply The FLO Vigaro "Next Generation" (Art. no. 20300020) is supplied with the following components. Additional accessories are optionally available. Description 20300015 FLO Vigaro "Next Generation" 31210020 FLO Vigaro memory card 4080001x Carrying bag 50000080 hose system 1800 mm, Ø... -
Page 47: Spare Parts
- Male 22 mm connection or additionally a suitable adapter Only use accessories for which evidence of EC conformity is available. Spare parts The following spare parts are available for the FLO Vigaro: Description 31100010 Glass beaker for FLO devices... -
Page 48: Declarations Regarding Electromagnetic Compatibility
Guidelines and manufacturer's declaration - Electromagnetic emissions The FLO Vigaro is intended for use in the electromagnetic environment specified below. The user of the FLO Vigaro should ensure that it is used in such an environment. Electromagnetic environment - Emissions test... - Page 49 1/2 cycle for 1/2 cycle and voltage hospital environment. If the (> 95% dip) (> 95% dip) variations on supply user of the FLO Vigaro requires as per continued function during 40% U 40% U IEC 61000-4-11 interruptions in the power...
- Page 50 Recommended safety distances between portable and mobile RF telecommunications equipment (e.g. mobile phone) and the FLO Vigaro: The FLO Vigaro is intended for use in an electromagnetic environment in which RF disturbances are controlled. The customer or user of the FLO Vigaro can help avoid electromagnetic...
- Page 51 Declarations regarding electromagnetic compatibility Guidelines and manufacturer's declaration - Electromagnetic immunity The FLO Vigaro is intended for use in the electromagnetic environment specified below. The user of the FLO Vigaro should ensure that it is used in such an environment. Immunity IEC 60601...
- Page 52 RF transmitters, an electromagnetic site survey is recommended. If the measured field strength at the location in which the FLO Vigaro is used exceeds the applicable compliance level above, the FLO Vigaro should be observed at each location to verify normal operation.
-
Page 53: Technical Data
Technical data Technical data 20.1 Specifications Product class according to EC directive 93/42/EEC Electrical safety II (totally insulated) - Protection class - Protection level IP30 - Protection rating DIN EN 60601-1:2013 - Complies with standard Electrical Connection - Alternating current 100 - 240 V AC automatic, 50 - 60 Hz, tolerance -15 % to +10 % - Direct current... - Page 54 Technical data Warming the breathed air: +1.8 °C - without the humidifier +39.8 °C - with the humidifier Operation Continuous operation 4 to 30 hPa (≈ cmH2O) Operating Range The maximum pressure < 40 hPa (≈ cmH2O) is not exceeded even at the first error 19.48 dB (L DIN EN ISO 3744)
- Page 55 Technical data Filling level humidifier - Operation without Do not add water humidification 100 to 300 ml - Operation with humidification 200 ml for 6 hours of therapy at - Consumpton 10 hPa (≈ cmH2O) pressure, room temperature and max. air humidifier heating level Air filtering 12–18 months,...
-
Page 56: Rate Of Flow / Pressure Accuracy
Technical data 20.2 Rate of flow / pressure accuracy Flow according to DIN EN ISO 17510-1: Output of breathing therapy device for the following pressure settings: Test pressures Pmin + Pmin + Pmin + ¼ ½ ¾ Pressure measured at the patient 22.5 connector (hPa) Average flow at the... -
Page 57: Function Diagram
20.3 Function diagram The FLO Vigaro is equipped with a total of 2 pressure sensors, which ensure control together with the turbine and CPU. They each use a display of 2 x 16 characters. This shows for example the current actual pressure during operation. - Page 58 Index Disinfection 36, 40 Display, keys Disposal 14, 42 - A - Duration of use 41, 55 Actual pressure - E - Air flow Air humidification Electrical Connection Alarm Electrical safety 14, 53 Delay 29, 30 Electromagnetic Emissions Disconnection Electromagnetic Immunity medium priority Emissions Pressure too high...
- Page 59 Operating the device Filter change Transport Mask Scope of supply Memory card Serial Number Menu sequence, starting up device Setting up the FLO Vigaro Operation with 12V DC or 24V - O - Voltage Shutdown Operating Range Side effects Operation...
- Page 60 Travel 37, 43 Checklist Emergency solutions - U - User's responsibility - V - Voltage - W - Warning water consumption...
- Page 61 Notice...
- Page 62 Notice...
- Page 63 Handle recess USB interface Mains switch RS232 interface Mains connection Memory card slot Filter box Filter box lock Operation socket 24V (12V with adapter) (Front view of the device see front page)