

Introduction: Knot Training Knot Box


Hi all, this project was the results of several things. My involvement with the Boy Scouts of America, my love for knot tying and lastly and more importantly being unemployed for three months. Its amazing what you can accomplish when you are actively trying to find work.
I had already made other knot tying stations for the Troop I was involved with along with a few knot boards. I also developed a Knot Sure™ tying program to help scouts and adult leaders too. More about that at the end.
Now this was back when I didn't have a lot wood working tools. So I can't really show a lot of the production pics as most of them have been lost either prints or digitally over the years. I had some scrap wood left over from other projects and I concocted a design for an oblong box with 7 stations (there are 7 basic knots Scouts) internally where scouts could step up and practice tying the scout knots required for various rank advancement.
I'll do my best to recreate how I managed all of this. This was made back in 2005 and is still being used today.
Supplies
Now clearly you don't have to try and replicate this exact project as I used scraps to accomplish this. You can make it how you choose. Maybe even individual stations. Anyway here is a basic list of materials I used:
- 1/2" Plywood scrap sheet
- 1/2" 6" x 8' pine board
- 1/8" thick scrap gypsum board
- 1/2" thick scrap furring strip 36"
- 1/4" Dowel Rod 36"
- Wood glue
- Wood Screws
- Brad Staples
- Hot Glue
- 3 Brass Eye hooks
- 2 Brass Hinges
- 4 Brass Toggle Latch Clasps with Hasps
- Brass brad nail (tacks)
- 1/4" thick white Rope
- 1/2" thick white twine
- 3/8" Hemp rope
- Quart Flat Brown Paint
- Gold Sharpie
- Scores and scores of Knot books
Step 1: Make the Box


I’ll break down this into two sections as that’s how the box is.
Using the scrap wood I had I made two oblonged framed boxes. (Dimensions see image) I assembled the box halves with wood glue and wood screws. I painted the overall box inside and out brown before working on to the insides.
Step 2: Left Section


I cut a section of 1/8” thick gypsum board to fit perfectly in the back of the box. I glue it in to place. To help finish it I hot glued a piece of 1/4” thick rope all away around the edge to hide the edges. I divided the back into four areas, each area will be for a specific knot.
Area 1: Clove hitch (One 18” long 1/4” rope) Area 2: Timber hitch (One 18” long 1/4” rope) Area 3: Two Half hitch (One 18” long 1/4” rope) Area 4: Taught Line (One 18” long 1/4” rope)
In each area I put a 8.75” length section of actual scrap tree wood (each about 1.5” in diameter). I cut each limb to fit snug from top to bottom. Before securing the limbs in place I tied and glued an example of each knot for each section towards the top. (Note I made the mistake on the first three knots varnishing them it wasn’t needed and turned the ropes yellow)
Then I glued & nailed to the back side of the limb at the bottom the actual tying rope that can be used to practice with. I wedge the limbs into the appropriate area using a small amount of wood glue. To help keep them in place I use a 1.5” screw from the top and bottom outside of the box.
Step 3: Right Section


This side of box I divided into four areas, but only need three for the other three Scout knots. In the last area I put my Knot Sure™ tying logo from my custom Knot Sure™ tying program I created (complete with custom patch).
Area 5: Square Knot (Two 18” ropes) Area 6: Sheet Bend (Two 18” ropes) Area 7: Bowline (One 18” long rope) Area 8: Knot Sure™ program art
I put a half inch furring strip at the top and bottom on the long sides in the back. Like the left section I cut a same size section of gypsum board to fit over the back with the furring strips in place. This leaves a .5” gap behind it making it false back inside to where I could drill holes for the tying ropes for each section.
Before putting false back into position I drilled holes just big enough (1/4”) to feed the sections of rope through. I did a stopper knot at one end of each piece of rope before feeding it through. To keep them secured for continual use I tied an additional knot as tight as I could up against the face of the gypsum board.
With ropes pulled through and secured, I glued the false back into place. And like the left section finished it with a rope boarder hot glued in place. Each knot tying rope portion is about 18” long. At the top in the appropriate area I glued a sample of each knot in place.
Step 4: Join Sections


I used a brass hinges at the short end. It makes for and awkward opening but it helps with the over display and training usage. On the opposite end of the hinges I placed two toggle latch clasps with hasps to hold it together. Plus an additional two spaced strategically across the top of the box.
As cumbersome as the long box is I needed a way to carry it. To facilitate this I braided two handles for each section. I took this also as opportunity to tie two different style braided handles (a Square Crown Sennit and a Round Crown Sennit. I drilled two holes in each section spaced apart. Fed each handles loose ropes through and glued and brad stapled to secure in place. This proved more than adequate to lift with and support the box when picking it up.
Step 5: The Fun Part - Decorate the Box


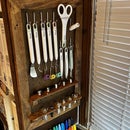
Now to just look at the outside of the box (other than the handles) you’d have no idea what its all about. So putting my knot knowledge to the test I proceed to tie any and every kind of knot, hitch and or braid samples I could find. I tied each using small 1/8” gauge rope. After tying each knot I nailed into position on the exterior of the box with brass brads (tacks). Using a gold sharpie I identify each knot and or braid style. All the loose knots on the right section were easy to attach.
On the left section to be able to display the hitch style knots I had to hook a length of 1/4” dowel rod to the box. I first tied all the hitches I wanted to display and fit them over the rod. I then secured the rod with 3 brass eye hooks bending the ends closed around the rod for a more secure fit. After this I positioned the hitches along the rod and nailed each into place. Most of the knots, as you can see, I used white rope. But for some of the seizings and braids along the bottom I used a hemp based twine like rope. The difference in colors helps highlight the seizure knots and braids.
Step 6: Using the Trainer


The sheer number of knots and size of this box impresses most of trainees when they first see it. Its been a great tool for both young Scouts and adult Scouters to train the basic 7 Scout Knots. As I said at the beginning, it is still being used today. I hope to use it very soon with my Tiger Den.
One thing about training knots the best way to learn a knot is to teach someone else after you think you’ve learned it. This cements it to your memory. Another point about knots almost all knots were created for a specific use, teaching the purpose of a knot also helps reinforce memory of it.
Now if you think tying some knots are difficult? Try drawing a knot. An if that’s not a challenge for you try doing it on a computer. It’s a whole new challenge.
Its important to remember explain and demonstrate how to tie the knot. Then using the Knot trainer let them practice. Seeing the finished knot and having a visual direction can be beneficial as well. Not everyone learns the same way. Some people are visual others audible and by giving both directions will help various individuals learn and complete the knots.
Another recommendation is to give each trainee their own knot tying rope. This is something they can take with them to practice with and eventually teach others how to tie knots. The last picture is my actual knot tying rope that I've had for years.
I'd avoid waxy or propolyene twine. Hemp like twine can work but is rough on young hands. I recommend a Clothesline woven style rope. Usually about 1/4" in diameter and about 4' in length. This length comes in quited handy when out in the wild for all kinds of applications. When making these be sure to fuse the ends with a lighter. (Be careful as synthetic ropes will be super hot and can cause severe burns).
You could do a seizing style of wrap at the ends but this is time consuming and although its pretty and impressive looking its a bit overkill for beginners. Who will more than likely lose their knot rope.
I hope seeing my training box inspires you to find your own way to teach Knot tying. I truly love knot tying and love helping others learn knots. Who knows it could save a life someday. At the very least knowing how to tie the proper knot can make your life easier.
Read on if interested in my Knot Sure™ program.
Step 7: Knot Sure™ Program


Earlier I mentioned my Knot Sure™ program. This program I designed to encourage my units scouts to learn the knots and receive recognition in the form of a patch. This was originally posted on our units website over 10 years ago. The website is no longer active but the PDF is uploaded here.
Other units across the country have requested to use the program. The reason I designed the program is because I noticed that even though the knots are required for rank advancement some of the scouts retention, especially the older ones, was lacking. Mainly because they weren't actively having to use these knots on camp outs.
I feel this was happening mostly because of the advent Velcro and other improvements in camping gear. Heck most kids don’t even know how to tie their shoes nowadays with Velcro straps. So I wanted to aid and teach our scouts in that learning these 7 basic scout knots they’ll use them the rest of their life. If anyone is interested in the program feel free to reach out to me.
I've updated the Instructions for 2020. And removed the patch purchase option. If I get enough requests maybe I'll reorder.
Good Luck all you Knot Tiers.
Attachments

Second Prize in the
Rope & String Speed Challenge


