
What Is the Best Thermal Paste Pattern? Actual Performance Comparison

“Which thermal paste pattern is the best?” — this question has been an age-old debate amongst geeks. And no matter how hard they try, they never seem to conclude as to which pattern is actually the best.
Well, that changes today, as we’ve spent more than 15 hours doing a case study. During this study, we extensively tested different thermal paste patterns to find out which one offers the best thermal performance. While others have performed such tests in the past, they don’t address the performance based on the time duration of the stress test, as well as the quantity of thermal paste. But that’s not the case with our test.
That said, let’s dive right into it.
Case study summary: The best thermal paste pattern
The best application method depends on whether you’re experienced at applying thermal pastes or not. If you are, and you know how to control the volume of thermal paste you’re putting, you can literally use any of the methods and you won’t go wrong with it.
On the other hand, if you’re not experienced in controlling the volume, the buttered toast method is the top choice for you. That’s because you can spread the paste evenly across the CPU and get rid of excessive paste by using a spreader or spatula. In other methods, you have to estimate the correct volume and then rely on the heatsink’s pressure to spread the paste.
If you aren’t good at estimating, you’ll probably put too much or little thermal paste on the CPU, which, of course, can severely affect the heat conduction performance.
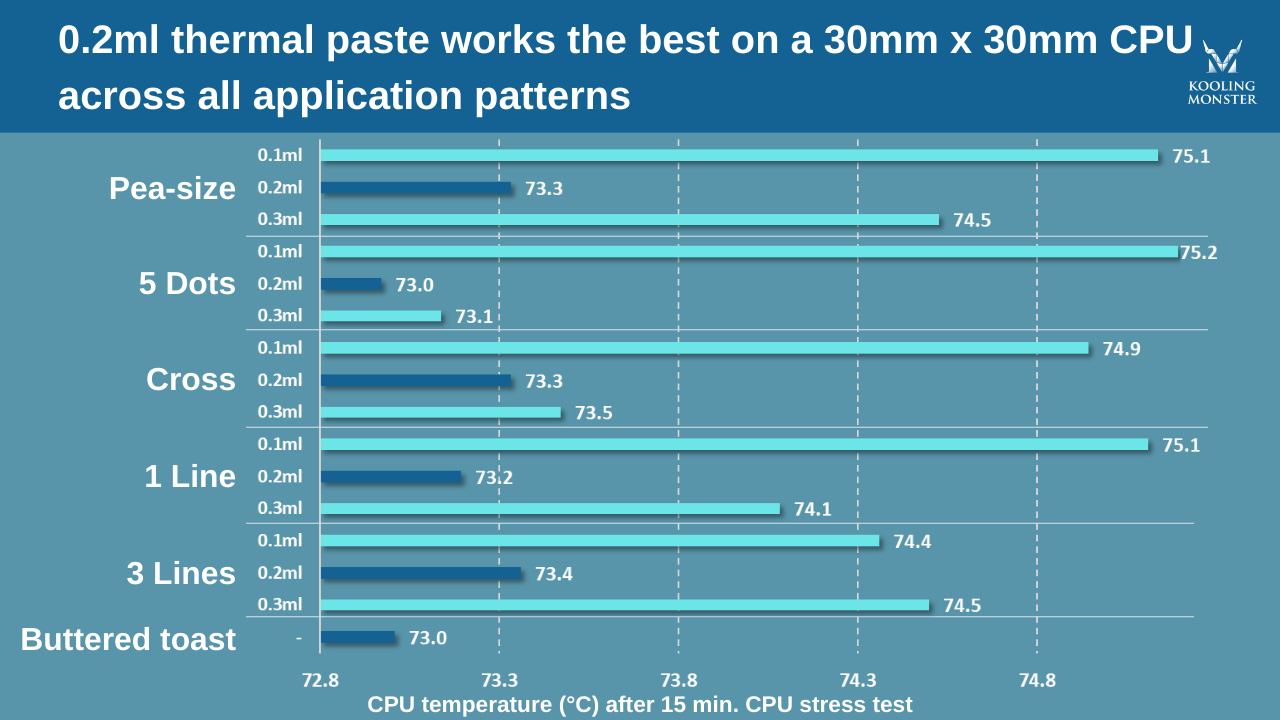
No matter which pattern you use, 0.2ml of thermal paste is the best volume you could use on a 30mm by 30mm processor.
Common thermal paste application methods and techniques
Before we talk about different application methods, you should know what you’re trying to achieve in the first place.
Well, the goal is to spread the paste evenly on the entire surface of the CPU. You want to end up with a flat, thin, and even surface to maximize the thermal performance.
A flat and even surface ensures there are no air gaps left between the CPU and the heatsink, which leads to better thermal conduction between the two. At the same time, a thick layer can increase the physical distance between the two, which could cause worse conduction. So, it’s essential to put a thin layer of thermal paste that’s also uniform.
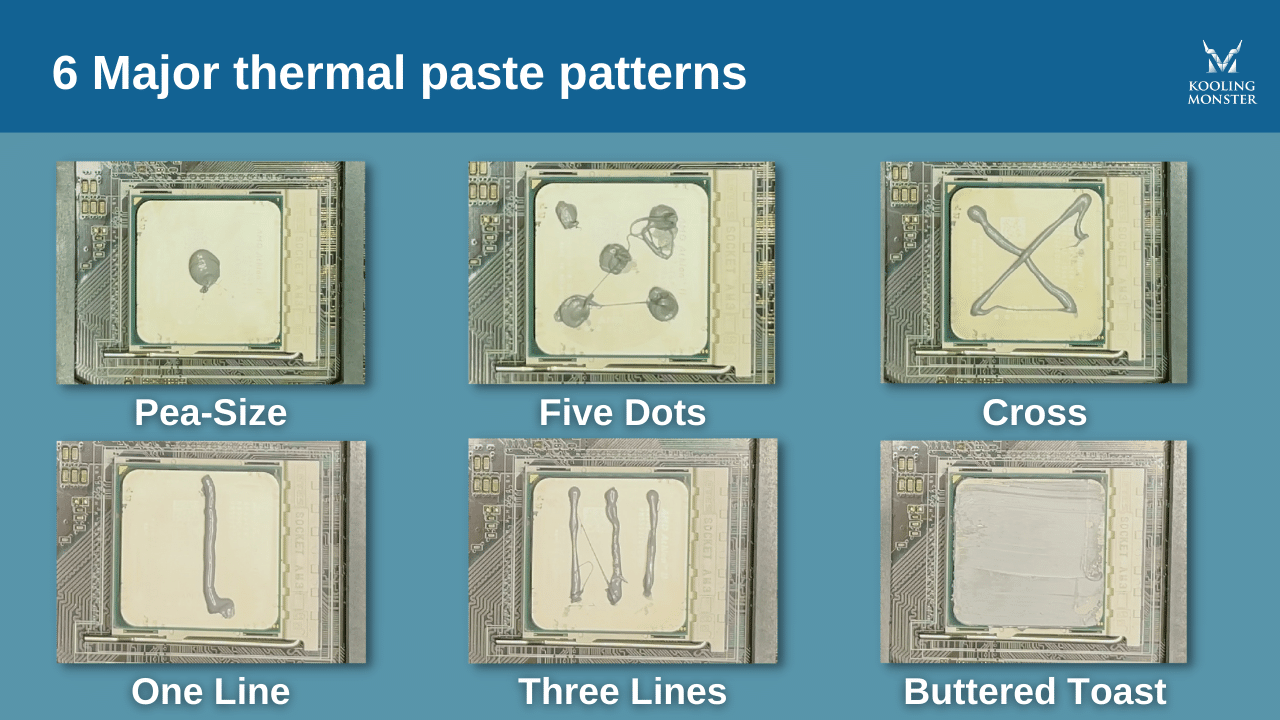
That said, there are 6 major methods you could use to apply thermal paste on the CPU, and they’re as follows.
Pea-size (1 dot method)
5 dots method
1 line method
3 lines method
Cross method (also known as the “X” method)
Buttered toast method
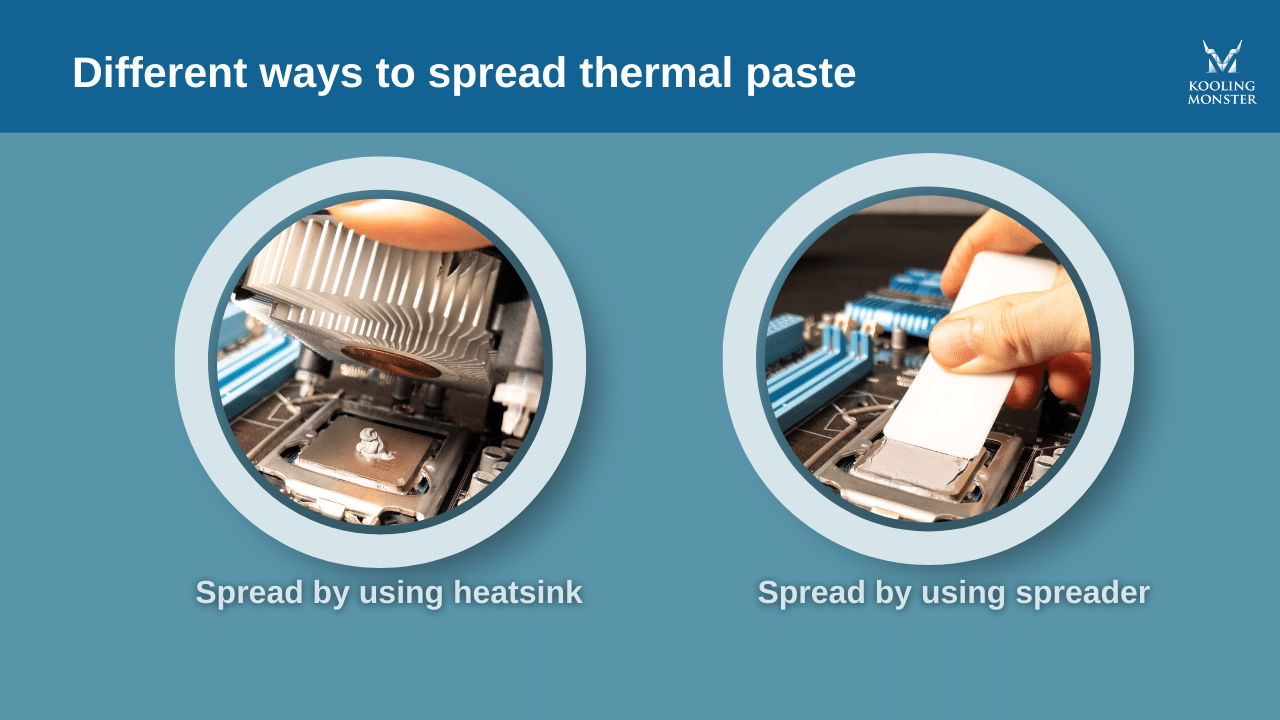
As you can see, you don’t have to spread the paste on the CPU in the first 5 methods. That’s because it’s automatically spread out when you put the heatsink on top.
Case study: Finding out the best way to spread thermal paste
People have debated the “best” application method for quite some time now — but no one could come to a conclusion.
To clear this up, we performed a case study where we tested the thermal performance in different circumstances. Normally, such tests don’t take into account the duration of the stress test and the different amounts of thermal paste you could use.
However, we kept these metrics into consideration. For this test, we used the following setup.
Thermal paste
Thermal paste quantity
● 0.1ml, 0.2ml, and 0.3ml
PC specs
● Intel Core i3-10105F (30mm x 30mm) CPU
● Asus H510M-E Motherboard
● Air Cooling Golden Field
● ADATA 8GB Memory
We intentionally used a weaker cooling system in this test. The purpose of doing this was to have a more clear indication of how well each pattern works.
Software
● AIDA 64 for the stress test
● HWinfo to measure temperature
Results

If you use the right amount of thermal paste, it doesn’t really matter which method you apply. The difference between each one is not big. The CPU temperatures from different application pattern all fixed at ~73℃ after our stress test.
However, if you’re not good at measuring paste volume, the buttered toasts method is the best one for you.
Our recommended best CPU thermal paste pattern and why
We believe there’s no single application pattern that’s better than the others. However, it depends on what kind of user you are.
As mentioned earlier, the buttered toast method lets you remove the excess thermal paste from the CPU before you put down the heat sink. So, it’s the best method for people who have a poor judgment of how much paste they’re putting on.

On the contrary, if you have experience in applying thermal pastes and can calculate the exact amount, say 0.2ml, then you could also blindly go for one of the other methods.
So, if you’re someone who can precisely calculate how much thermal paste you’re putting, you can use whatever method you like.
But — if you’re a newbie and are afraid you’d put too much or too little thermal paste, we recommend the buttered toast method. That’s because it lets you see precisely how much paste you’ve applied before you put the heatsink down. If it’s too much, you can remove the excess amount. If it’s too little, you can put more.
Furthermore, the quality of your thermal paste matters, too. That’s because bad-quality thermal pastes don’t have good fluidity, and they won’t spread as expected when you put the heatsink down.
So, if you know you have a worse-quality thermal paste, we recommend going with the buttered toast method.
The bottom line
No application method is technically better than the others, and we have proven that by performing the extensive case study we discussed above.
The goal is to get a smooth and thin layer of thermal paste, it doesn’t matter which pattern you use to get that.
However, the buttered toast method certainly makes it easy for you to achieve that goal, especially if you don’t have experience in putting on the right volume merely by guessing.
Frequently Asked Questions
-
Thermal paste begins to spread immediately upon application, but its optimal dispersion typically occurs during the first heat cycle. This process can take anywhere from a few minutes to a couple of hours, depending on the specific system configuration.
-
Thermal pads and paste serve similar purposes but have different strengths. Pads are more user-friendly and less messy, but typically offer less thermal conductivity than paste. Paste usually provides better heat transfer but requires more careful application.
-
Investing in higher-quality thermal paste can be worthwhile. Superior thermal paste can provide better heat conductivity, improving CPU/GPU cooling efficiency. This can potentially enhance system performance and longevity, especially in high-performance or overclocked systems.
-
The primary heat-conducting ingredient in thermal paste is typically a metal or ceramic compound. Common examples include silver, aluminum, zinc oxide, or copper, often mixed with silicone or another binder. These materials provide the high thermal conductivity necessary for effective heat transfer.
-
The correct application of thermal paste should create a thin, evenly spread layer between the CPU/GPU and the heat sink. If your system operates at expected temperatures under load, the paste is likely applied correctly. However, if temperatures are higher than normal, you might need to reapply the paste.